Walkthrough
Move records to another Salesforce org
Use a canvas to move a selected set of records from one Salesforce org to another. Before anything is uploaded, Org Loom lets you decide which records should be created, which should update records that already exist, and how to handle differences between the two orgs.
Before you begin
In this walkthrough, the source org is the Salesforce org that the records come from. The destination org is where you want to create or update them.
You will need:
- A connection to the source org.
- The records you want to move on the canvas.
- Permission to sign in to the destination org. Org Loom must also be installed there, and your destination user must have the required Org Loom permission set.
- In a Team workspace, the Browse records and Upload to Salesforce permissions from a workspace admin.
Keep the same browser tab open until you finish. Org Loom keeps the in-progress migration available while you sign in to the destination and review the records. If you close the tab, you may need to return to the source org and start the migration again.
The process
- Place the source records on the canvas.
- Choose Tools ▾ → Migrate to another org…
- Select or connect the destination org.
- Review what should happen to each record.
- Resolve fields or values that differ in the destination.
- Review the plan, then upload it to Salesforce.
Nothing is written to the destination while you work through these steps. Salesforce records change only when you complete the final upload.
Step 1: Prepare the source records
Connect to the source org and place the records you want to move on the canvas. You can browse Salesforce, import a CSV, run a SOQL import, or open a saved canvas.
Include every record that you want to move. If the records are related, include both sides of the relationship. For example, place both an Account and its Contacts on the canvas if you want those relationships recreated in the destination.
Step 2: Choose the destination org
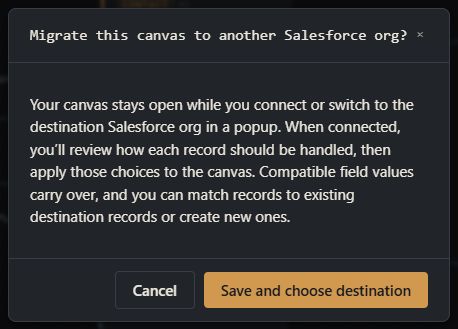
Open Tools ▾ and select Migrate to another org…. Review the confirmation, then choose Save and choose destination.
Choose an existing Salesforce connection or add the destination org and complete its Salesforce sign-in. Org Loom then returns you to the canvas and opens Prepare migration. Check the destination shown at the top of the guide before you continue.
Step 3: Decide what happens to each record
Every record starts as Create new. Leave that selected when you want a new record in the destination.
Choose Update existing when the destination already has the record and you want to update it instead of creating a duplicate. Org Loom searches for likely matches using an identifying value already on that canvas record.
- If one destination record is found, review the proposed record.
- If several are found, choose the correct destination record.
- If no useful match is found, expand Try another identifying field and choose another identifying field, or return the record to Create new.
Avoiding duplicates: If a record already exists in the destination but remains set to Create new, the upload creates another record. Review this step carefully when moving the same data more than once.
Step 4: Resolve destination differences
The two orgs do not need to have identical Salesforce setups. The Fields step shows anything that needs a decision before the records can be uploaded.
- Required fields: enter a value that the destination requires for a new record.
- Record types: choose an available destination record type when there is no automatic match.
- Picklist values: choose an allowed destination value when the source value is not available there.
- Unavailable fields: choose Don't map, or map the value to a compatible destination field. If the selected field uses a different set of choices, select the destination value as well. The selector stays visible and shows Resolved after the decision, so you can review or change it before continuing. Your choice is still available if you close and reopen the guide.
An unavailable field may not exist in the destination, or your user may not have permission to see it. If you expected the field to be available, check with the destination org's Salesforce administrator before leaving it unmapped.
Don't map leaves the source value out of this migration. It does not erase a value from an existing destination record, and it does not change the source record.
Step 5: Review and apply the plan
The final step summarizes how many records will be created, how many will update existing records, and how many values will be left out. Return to an earlier step if those counts are not what you expect.
Choose Apply migration to canvas to return to the canvas. This updates the canvas to show which records will be created, which existing destination records will be updated, and which field values will be included. It still does not write anything to Salesforce.
Step 6: Upload to the destination
Select Upload to Salesforce and review the upload preview. Salesforce applies the destination user's permissions, required fields, validation rules, and other business rules before accepting the records.
A successful upload creates the new records, updates the records you matched, and reconnects the relationships represented on the canvas. When all records finish successfully, migration mode ends and the canvas represents the destination records.
If only part of the upload succeeds, migration mode remains active. Review the reported errors, correct the remaining records, and upload again.
How relationships are handled
Relationships drawn between records on the canvas are recreated using the corresponding destination records. This works when both records are new and when one record is matched to an existing destination record. For example, a new Contact can be linked to an Account that already exists in the destination.
Only records and relationships included on the canvas are part of the migration. Related records elsewhere in the source org are not added automatically.
Cancel, reopen, or discard
- Cancel closes the Prepare migration guide without applying decisions made since you opened it. Use Review and apply in the migration bar to open it again.
- Discard ends migration mode but leaves the records on the canvas. It does not delete Salesforce records or undo an upload that has already occurred.
What this migration does not move
- Records that are not on the canvas.
- Salesforce files and attachments.
- Field history, activity history, or other record history.
- Salesforce configuration such as objects, fields, validation rules, or page layouts.
- Values you explicitly choose not to map.
The source records are never changed by the migration. The process reads the records placed on the canvas and writes only to the destination when you upload.